
The standard for
multi-screen media servers
Get ProVideoPlayer
ProVideoPlayer 3 License
For new customers or customers needing addtional licenses. This license will also work on a copy of PVP2, but one or both licenses can only be used on one Mac at a time (you cannot have PVP2 on one machine and PVP3 on another). You are free to disable them on one machine and move them both to another system should the need arise.
$999USD
PVP 3 License Rental
If you only need ProVideoPlayer for a single event or short period of time, you can purchase a rental license. You will get a two-week or a one-month time expiring license that begins on the day it is purchased.
Upgrade existing PVP 2 License to PVP 3
You can upgrade one or more existing PVP 2 license(s) below for free or discounted licenses of PVP 3. The discount amount depends on your purchase date, which is outlined below. Your PVP 2 License will still work, but you can only use it on the same system you use PVP 3 on. You can also move the licenses between systems, but you would have to move both.
- If you purchased on or after September 1, 2017 you will get a dollar-for-dollar credit towards a PVP 3 License.
- If you purchased prior to September 1, 2017 you get 50% off the $999 retail price ($499.50).
- PVP 1 Licenses are not eligible for upgrade.
Download ProVideoPlayer
Video Tutorials
Get Served
ProVideoPlayer (PVP) is a Mac-based multi-screen media server application designed to play back and manipulate video across one or more screens.
For over a decade PVP has been powering multi-screen playback and video effects for live events and fixed installations, many times feeding video to expensive dedicated hardware (such as screen control systems) for further manipulation. We set out to see if we could make a single product that would provide the tools needed for many productions when the complexity of more expensive solutions is unnecessary. That is the vision realized with PVP3.

Design Philosophy
This is what inspires us
Output Tools
What we can do
User Interface
How we interact with you
Playing Nicely with Others
Interacting with other tools
Design Philosophy
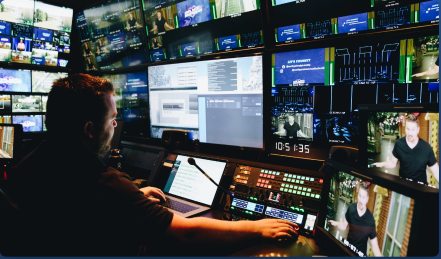
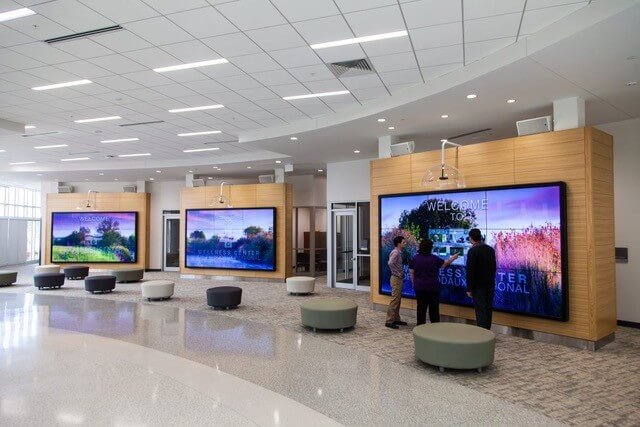
Live Production or Fixed Installation
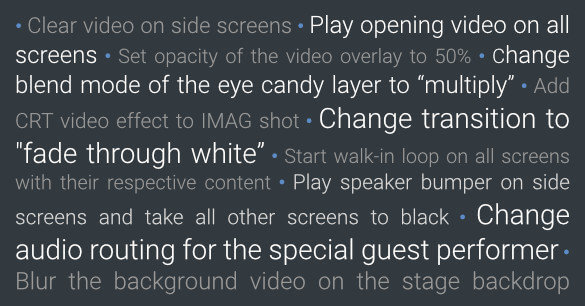
Cues and Actions
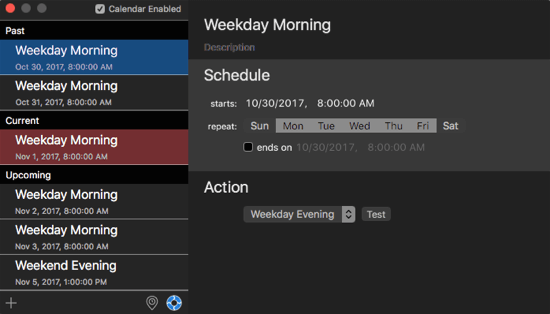
Scheduler – Set it and Forget it
Output Tools
Map What You Want.
Where and When You Want It.
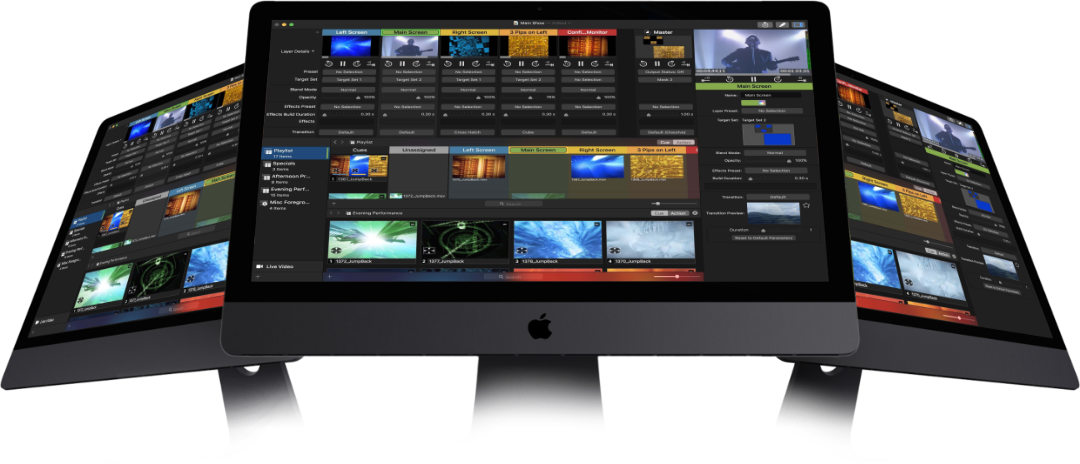
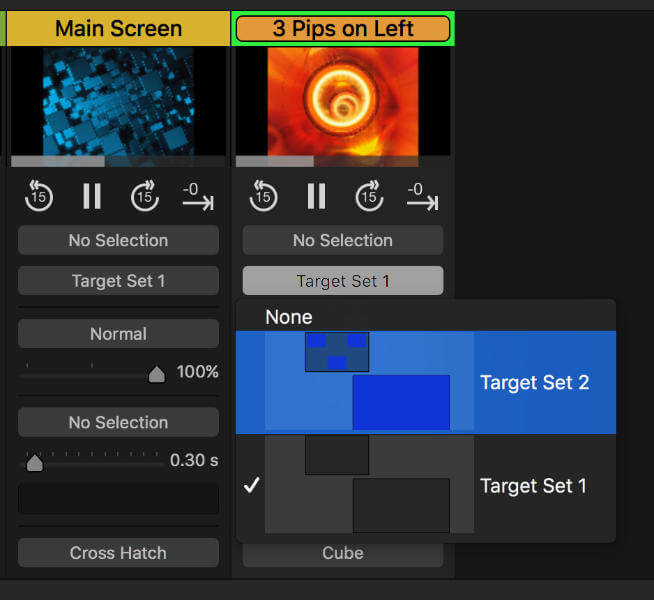
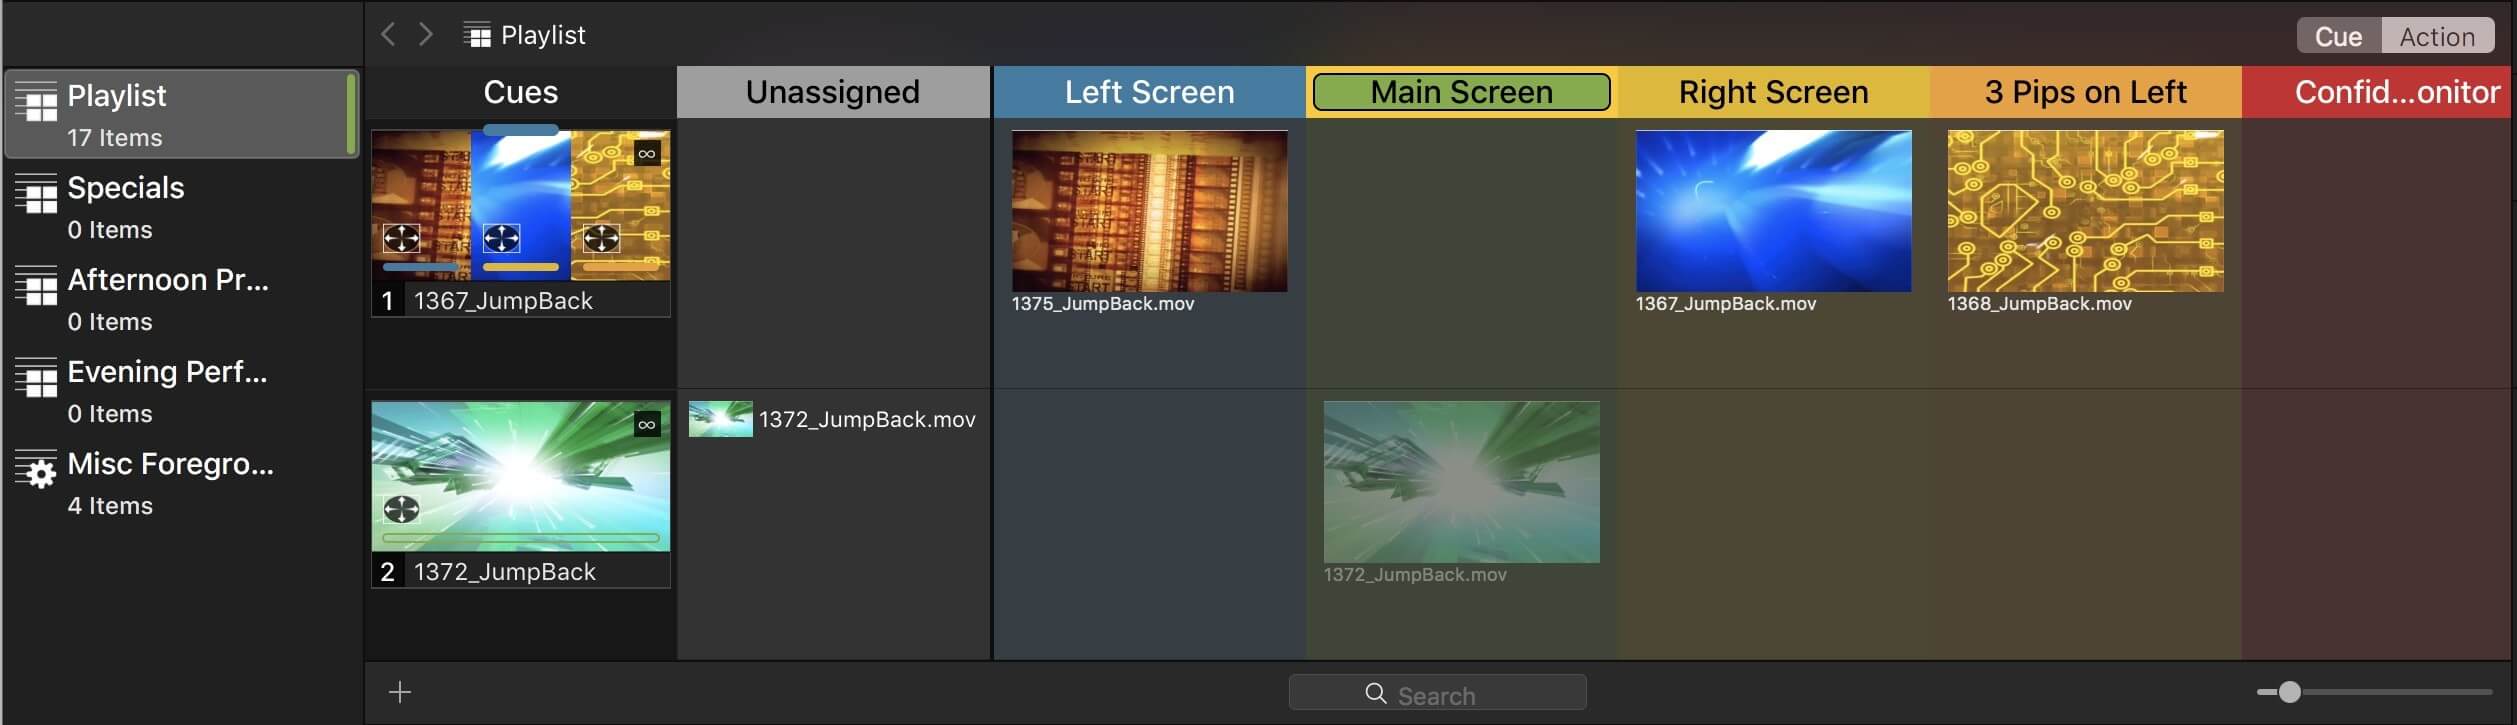
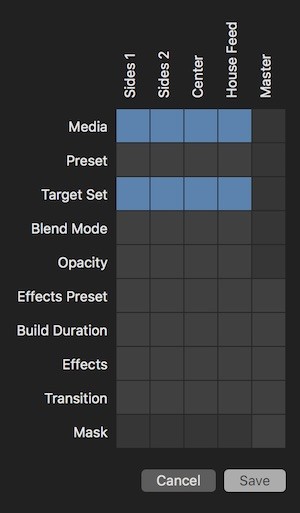
PVP3 is a multi-screen, multi-layer video playback and processing tool. That means you can connect as many displays as your computer can handle, including graphics-direct (DVI, HDMI, VGA), broadcast (SDI), network-based (NDI, Syphon) outputs, or any combination therein. The media triggered in any layer can be mapped to one or more screens… either full screen or within one or more targets (rectangle, polygon, circle, bezier path). This allows for fine-tuned design of content across rotated screens, screens of various shapes, and odd aspect ratios. Because the target sets that you build are global throughout the application, you can easily change target sets on any given layer at any time and save this mapping as part of the cue so content always plays exactly the way you want it. Additional options include specifying a default layer for all content played within a playlist ensuring that content made for a specific screen is never played anywhere else.
What’s on Your Canvas? A Variety of Tools for a Variety of Displays
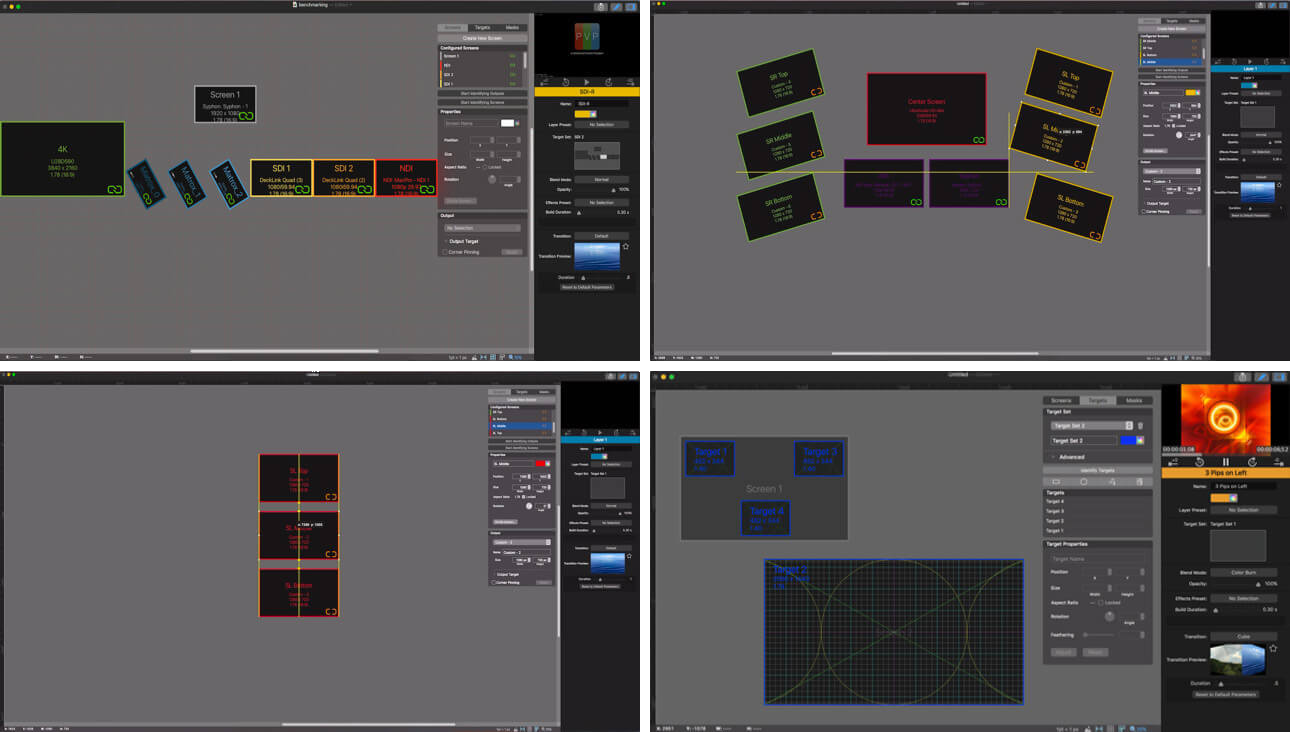
If you have an array of LCD displays in a mosaic of landscape, portrait, or odd angles, you can match their physical orientation from within our canvas so content is matched precisely. What’s more, our canvas editor lets you work with displays in physical units (feet, meters, etc), so you can see your output screens in relative physical size to every other screen.
Outputs, Screens, and Targets Please Identify Yourselves!
As productions get more and more complex with more and more screens, the ability to quickly identify and verify the signal flow from your machine to the final output screens is hugely beneficial. When outputs or screens are identified, the name of the output, the signal type, and the signal format are shown. When targets are identified, a test pattern, or a graphic of your choosing is shown. Never again will you spend hours making sure routing from source to output is correct — you’ll know at a glance.
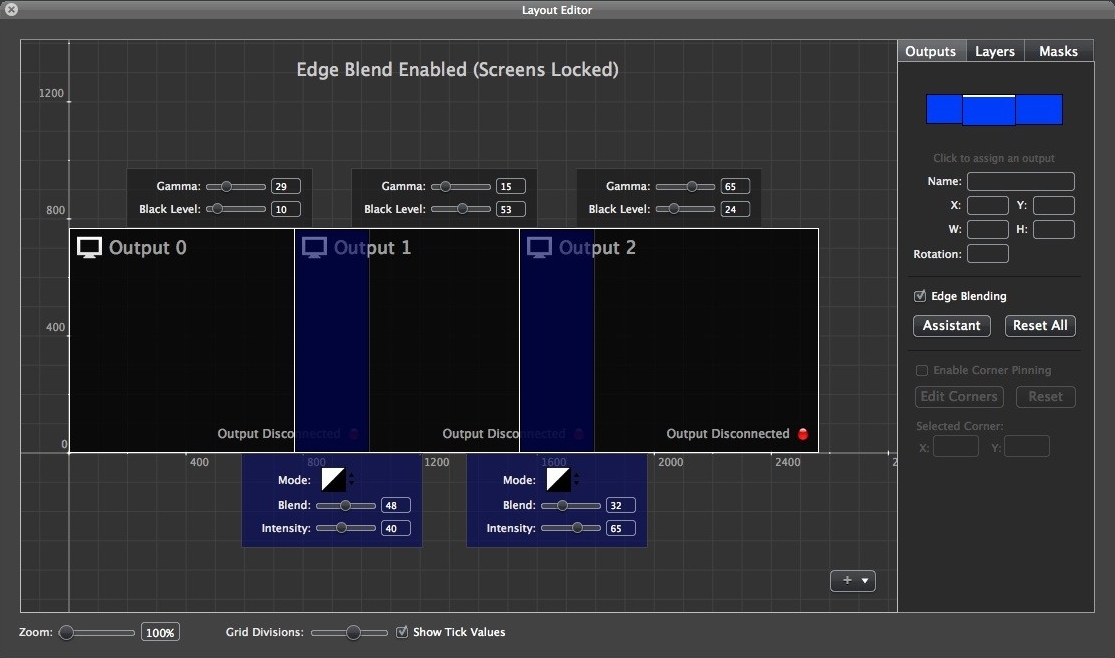
pvp2_edge_blending_4
Layout Editor > Edge Blend
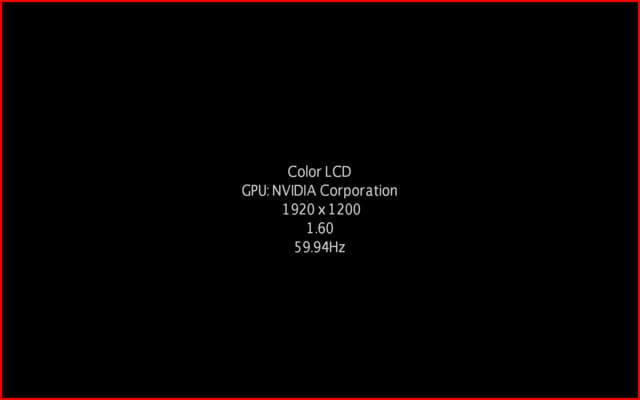
PVP3-Identify-Screen
Identify Screen

PVP3-Identify-Targets
Identify Targets
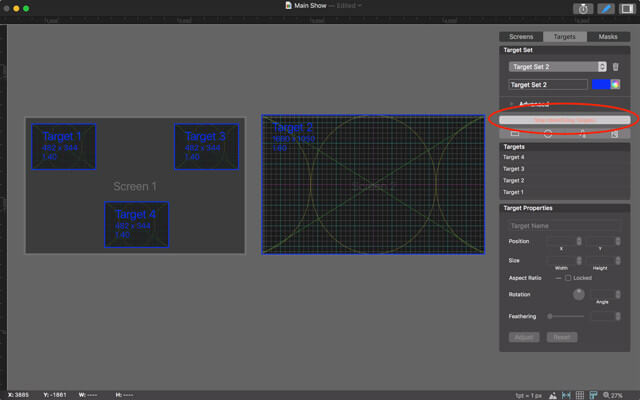
PVP3-Layout-Editor-Identify-Targets
Layout Editor
Multi-Channel Audio Control
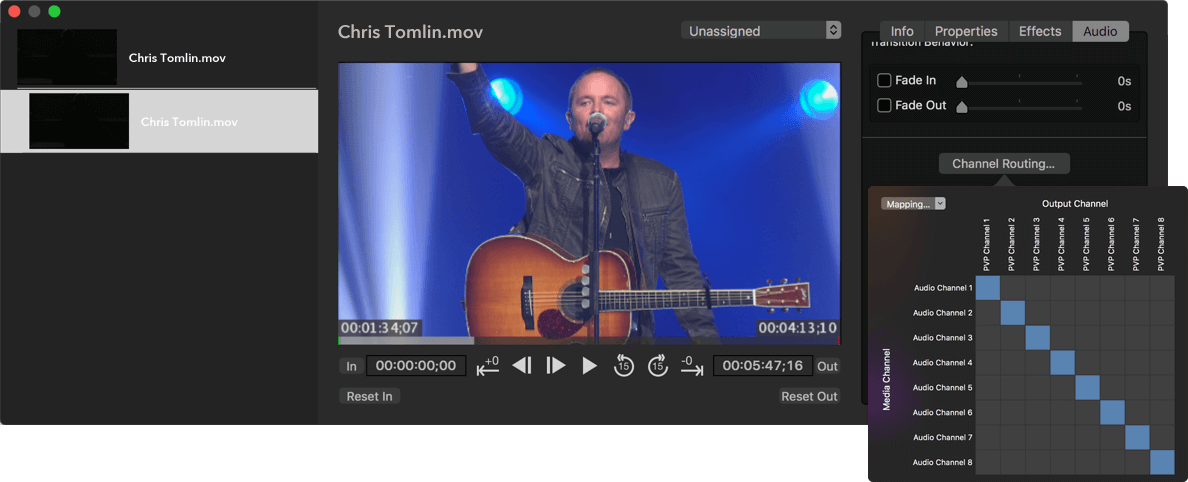
When working live events and conferences, it is all too common to receive batches of videos from multiple producers at the last minute… each with their own audio level settings and channel mapping. One band might have a click track in channel 1… another on channel 5. Keeping track of what channels contain what content is a frustrating task for video jockeys as there’s never been an easy way to know what track is what or to change how it is routed to the audio guys. With PVP3, you can monitor and solo each channel of content through the main or secondary output… route source audio channels to one or more output channels, normalize the audio of each channel, or change the gain of each channel.
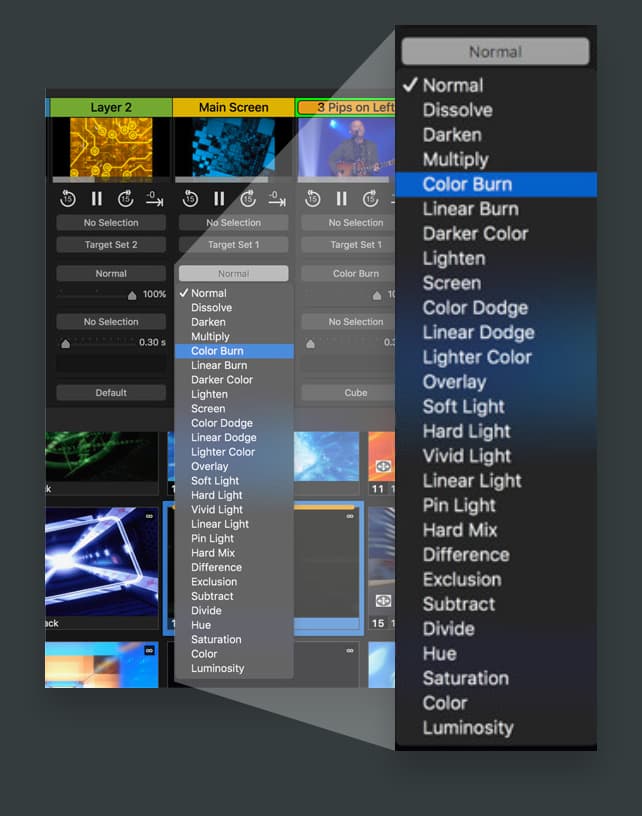
Transparency and Blend Modes
DYNAMICALLY MIX MEDIA TO CREATE
EYE-CATCHING VISUALS
Beyond video effects, which manipulate the visual aspects of one video based on specific algorithms, PVP3 allows you to blend video layers together using a variety of various blend modes. To start with, each layer has an opacity setting so you can control the level of transparency of one video to the videos on lower layers. 28 other blend modes allow precise control over how your visual layers will interact. For example, put a dynamic mask visual on top of your videos to create a dynamic frame, or combine a motion background with a live video feed to stylize a live camera shot.
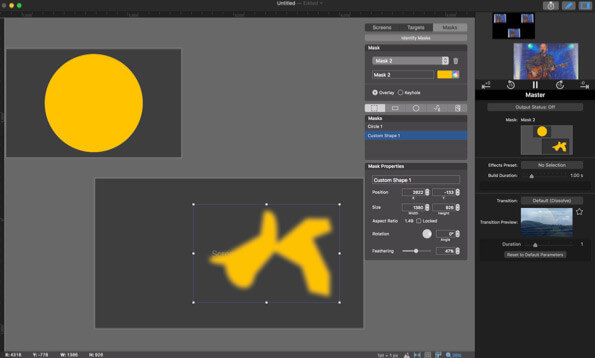
Masks – Because what You Don’t See is
Just as Important as What You Do
PVP3’s comprehensive mask editor allows for multiple shapes (including rectangles, circles, freeform bezier paths) with or without feathered edges, or an imported image with an alpha channel. Mask sets can be triggered manually or as an action on any given cue.
User Interface
Sophisticated, not Complex.
PVP3 has an extraordinarily powerful toolset capable of running the most complex productions in the world. If you have a more simple set up, say just a single screen, the UI adapts to your needs and allows you to navigate a more simplified UI.
By focusing on keeping things simple you will know at a glance exactly what will happen when you fire a cue.
Colors. Everywhere.
Proper use of colors can significantly help you keep track of layers, targets, and clips. For example, you can specify red as the color for your side screen outputs so that you know anything that is going to only go to the side screens should be colored red. You can make a playlist default to a specific layer, in which case every action on that layer will show an unfilled “pill” at the bottom of the thumbnail indicating that when triggered that action will go to the side screen layer. The fact that it makes the user interface pretty is just a bonus.
Color-Coded Layers Panel

Color-Coded Actions Panel
Snapshots. Snag what you see!
It happens all the time. You need to try out content on multiple screens for a sophisticated production. You put up all the content on all the screens. The producer makes some changes — brighten up this clip, color match this clip, etc. — and then, when it’s perfect, save it. Problem is, you have made these changes to the individual layers to do it in real-time and will have to recreated it as a preset.
Well, now you can just save the exact look you have as a cue using our Snapshot function. With this new functionality, you can save the output and all its settings easily with the flexibility to choose what visual aspects of the output you desire to be saved.
Playing Nicely with Others
Because We’re Just a Part of the Community
Snapshots. Snag what you see!
Because PVP3 supports NDI inputs, you can send an NDI signal from a ProPresenter equipped computer on your network (with appropriate modules enabled) and map that as you would any other live video input within PVP3. This lets you show video, lyrics, titles, lower thirds, social media, or any other output generated by ProPresenter or ProPresenter Scoreboard to be mapped wherever you desire in PVP3.
If you are sending an alpha channel feed from ProPresenter, the alpha key is preserved in the output of PVP3. Audio is also streamed through the ProPresenter NDI output. In short, it just works like it should.
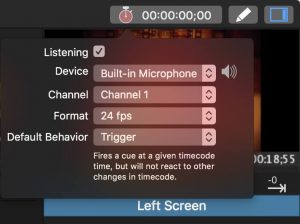
Time Code Control
PVP3 features a comprehensive timecode control mechanism at a playlist level. This gives you the flexibility to either fire Cues of content that can run freely once triggered, or individual actions that will follow the timecode precisely. In this manner, you can set up an entire show of timecode controlled cues and walk away confident that the cues you want to see at any given time will be there… right where you want them.
If you are sending an alpha channel feed from ProPresenter, the alpha key is preserved in the output of PVP3. Audio is also streamed through the ProPresenter NDI output. In short, it just works like it should.
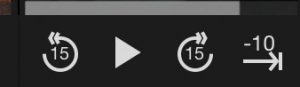
Cue to Cue, Made for You
PVP3 features a number of features to help your cue-to-cue rehearsals run smoothly. Need to jump to 10 seconds to the end of the video? A single button makes that happen. Does your on-stage band want to rehearse the middle of the song with video? Timecode follow tracks right along. The biggest pitfalls in any production are in the transitions between cues… we set out to make the rehearsal of these elements easy.
If you are sending an alpha channel feed from ProPresenter, the alpha key is preserved in the output of PVP3. Audio is also streamed through the ProPresenter NDI output. In short, it just works like it should.
Live Video Inputs with Previews
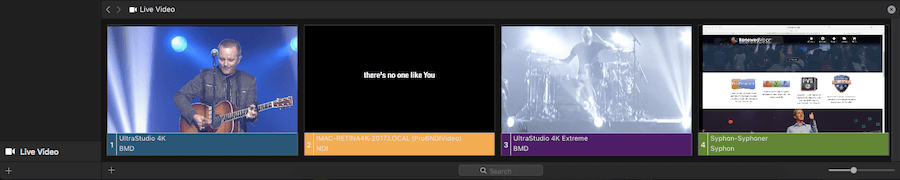
Static thumbnails are fine for identifying video clips, but when you have multiple live-video sources, you want to see what is going to go to the screen before you fire it. Our Live Video playlist shows what’s happening on any hardware (SDI/HDMI), software (syphon), or network (NDI) video input in real-time.
Now, to be clear, we don’t think of PVP3 as a replacement to a dedicated video switcher for most productions, but when you have fixed cameras or need to frame multiple camera shots into different targets, you will appreciate this new functionality.
Stay in the spotlight
We're always highlighting new features, upgrades, and even our awesome clients. Stay up-to-date with us and join our newsletter.
Questions?
Our skilled support team is always here to help.
Shoot us a note and we'll respond within 24 hours.
Stay in the spotlight.
We're always highlighting new features, upgrades, and even our awesome clients. Stay up-to-date with us and join our newsletter.